 |
The
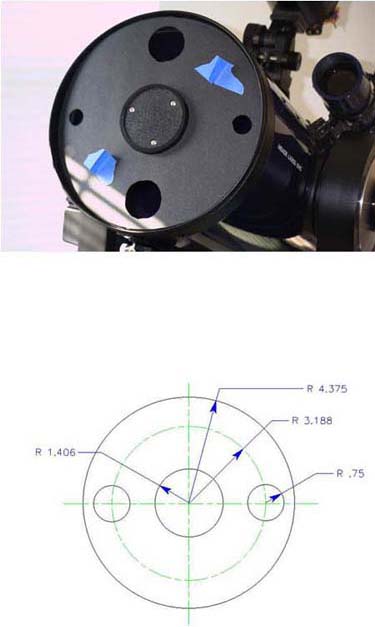
drawing shows the dimensions I used to make my mask for my 8" LX 200.
With these dimensions the center hole in the mask fits over the secondary
mirror holder in the corrector plate. You will need to change these
if you have a different kind/size of scope
If you are careful when you put
it in place, the mask will not even touch the corrector plate itself.
The blue tabs are just two pieces
of masking tape. They allow you to remove the mask without pushing
the mask in or accidentally touching the corrector plate with your fingers.
You will note that my mask has two sets of holes. That's because I was experimenting with different size holes. The smaller 3/4 inch holes are really too small, and you don't need them. That's why I removed them from the drawing. Dimensions in the drawing are in inches. |
 |
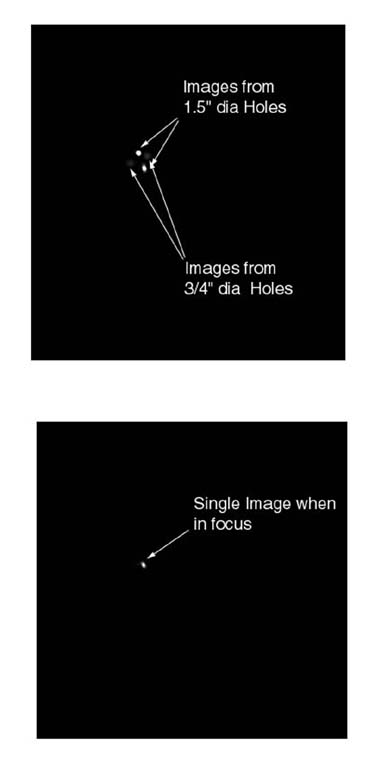
These
two images show how you use the mask.
First point the scope at a bright star. Magnitude two or brighter if you can, although I've used it on stars as dim as magnitude six. These examples were taken using the star Vega. The brighter the star the shorter exposure time you can use for the focusing operation. For Vega I was able to use a focus time of about 0.01 sec. For precision focusing, it's best to use a dimmer star. If the star is too bright the image will saturate and the star images will blend together, making it very difficult to tell when you are at peak focus. Start the camera software in it's focus mode. If the scope is out of focus, you will see two two star images (Top Photo). You just adjust the focus of the scope until you see a single star image (Bottom Photo). A few of tips on use: 1. Seeing and focal ratio play a big factor in how well you can focus the scope. You will eventually reach a point where the star looks perfect in one frame and slightly out in another. Just watch it for a few seconds and see if it generally looks OK. If not make tiny adjustments and watch again. I very seldom end a focus session thinking that I have it perfect. However, I always end it thinking "That's about as good as it's going to get." 2. I consider a remote Crayford focuser like the JMI NGF-S essential in making these critical adjustments. If you have to touch the scope to focus it, you will induce vibrations which must subside before you can check your results. It is also very difficult to make the tiny adjustments using the scopes focus knob. 3. DON'T FORGET TO REMOVE THE MASK BEFORE YOU START YOUR ASTRO IMAGINING! I've left mine in place more than once. |
|
Remove the mask for final precision focus: 1. As useful as the hartman mask is, you may still want to make final focusing adjustments without the mask. When imagining the Moon or planets, like Jupiter, Mars and Saturn, bring the planet into view, set the camera software focus and watch the image at full aperture. Make small adjustments to see if image contrast improves. 2. For stellar objects, I usually perform my final focus check without the mask using the Astro Art focus window on a star around magnitude 7. Astro Art has the advantage of being able to select a focus area around the desired star. This allows for a very fast refresh rate plus the software gives you a numerical indicator of peak intensity and the x and y spread of the light. Ideally focus is reached when the intensity number is reached and all of the light is falling on one pixel. |
|
|
|
Link to
the Arcturus Observatory Mask Page for more info on construction and use of
the Hartman Mask
Link to How to focus a CCD Camera from the The Dr. Richard Feynman Observatory
|
|
|
|
